And now for something completely different! The GUN4IR project is retro, and you technically hold it in your hand, but it’s definitely not a retro handheld. If you’ll allow us this brief side excursion, we recently were able to test out this system and felt that it would resonate enough with our readers to post about it here. We’ll be back with our regularly scheduled portable gaming coverage, but for now, let’s talk light guns.
A Brief History

Light guns hold a special place in the world of gaming. Few controllers map so closely between player input and the action they’re trying to simulate. Not only that, but light guns predate video games themselves. The earliest light gun games were electro-mechanical installations taking advantage of light-sensing vacuum tubes. For as long as we’ve been able to detect or emit light from a handheld gadget, someone’s been trying to turn it into a shooting gallery. Light gun games have been a permanent fixture in most arcades, and they came along for the ride when home consoles entered the scene.
The first home light guns were simple light detectors. When you pulled the trigger, the screen would briefly flash a mostly-black image, and if the gun detected a white block of light, they’d know they were pointed at a target. Later light guns would improve on this technique, taking advantage of the internal refresh rates and timings within a TV itself to identify where the gun was pointed. CRT TVs made it unusually easy to determine precisely where a plastic gun accessory was pointed without needing any extra equipment or hardware. With the rise of LCD displays however, light guns needed a new approach. Interestingly enough, it’s one that many gamers are already familiar with.
In the absence of CRT TV screens, light guns need some sort of frame of reference to work out where they’re pointing. The most common technique is to place several infrared LEDs around a display, and then use an IR sensor in the light gun itself to determine where those LEDs are located. From there, you can do some math and determine out where the gun’s IR sensor is pointing.

In other words, you need a Wii sensor bar. The Wii remote is an early version of this sort of light gun technique. Nintendo wanted the sensor bar to be relatively unobtrusive and easy to set up, so it just included two clusters of LEDs at the top of the user’s display. It’s great for navigating around menus, but made for slightly awkward light gun games on the Wii. The remote only had two points of reference, and the cursor had a habit of hovering around a rough area of a screen instead of delivering pinpoint accuracy. Most games compensated for this by drawing a persistent cursor on the screen, and designing games around larger targets than earlier light gun titles. It was a decent solution, but the tech was shaky enough to leave light gun purists holding onto their CRTs for the time being.

In the intervening years, several PC-based light gun accessories have tried to iterate on Nintendo’s approach. The most prominent of these was the AimTrak light gun. It delivered passable results with similar (but different) light bar technology, but still generally left enthusiast wanting. Meanwhile, Arcade cabinets finally made the jump to LCD screens. Light gun games like Time Crisis 4 generally employed larger IR LED arrays into the frame of the arcade cabinet to deliver a familiar light gun experience.

Then in 2019, the Sinden Light Gun burst onto the scene. This successful IndieGoGo project surprised the light gun crowd with a completely different approach. Rather than equipping the gun with an IR sensor, it uses an optical camera to detect which part of the screen it’s pointed at. This technique requires the display to have a permanent white boarder around the gameplay, but it delivered unparalleled accuracy compared to earlier systems. The Sinden light gun is the passion project of a UK developer, so the project was hit with significant lead times when the initial IndieGoGo proved to be a rousing success. Pair that with Covid era supply chain issues, and delivery dates could stretch out to the better part of the year. Thankfully things have settled back down to the wait of a copule months, but there was still an appetite among plastic gun fans for another option. This is where the GUN4IR project enters the picture.

GUN4IR is a project created by French developer Jean-Baptiste “JayBee” Bongrand. As the name implies, it once again leverages IR technology. Rather than using a simple sensor bar on the top of a display however, it uses four IR LED targets around a display to improve the accuracy. Get it? Gun-4-IR? The interesting aspect of the GUN4IR project however is that, well, it’s a project. JayBee’s working on making an off the shelf GUN4IR product, but for the time being its a DIY affair. (Update: The official GUN4IR store with pre-build guns is now live!)
In its most basic form, a GUN4IR setup needs four IR LEDs around a screen, and a gun equipped with an IR sensor, a trigger, and an Arduino. Beyond that, the system is completely customizable. You can add as many additional buttons to the gun as you’d like, equip it with rumble force feedback, provide it with solenoid kickback, or even add flashy LEDs to your gun. GUN4IR also has optional support for accessories like pedals and Wii nunchucks.
Building a GUN4IR light gun can cost more than a Sinden depending on how you spec it out, and it’s various components aren’t without their own lead times. But it’s the customizability that’s really taken the community by storm. Rather than being forced into a one-size-fits-all generic pistol, light gun enthusiasts can build the exact formfactor they’re looking for. House of the Dead 3 fans can create a plastic shotgun with a working pump-action reload, Time Crisis fans can repurpose legitimate arcade hardware to create a PC-friendly light gun with a slide action recoil, and the DIY crowd can cobble together all sorts of interesting experiments based off of various NERF guns and Super Soakers.
This article was originally meant as a how-to guide, but it turns out that it can be tricky to document your build process when you’re still figuring out things for yourself. If you’re looking for a step-by-step build instructions, we’d recommend checking out Arcade Pirate’s informative GUN4IR Ground Up Build video. Additionally, the ArcadeControls forum post on GUN4IR is a wealth of information, as is their community Discord. Instead, the rest of this article is going to focus on providing a starting point parts list for beginners, and give a general impression of what it’s like to build and use a GUN4IR light gun.
Picking Your Parts

The most comprehensive guide online of GUN4IR-tested parts is the Lightgunpedia wiki. Incidentally, this page is also completely in Spanish. Machine translation gets the job done with this particular page thankfully, and the GUN4IR firmware comes with an English PDF guide that provides useful circuit diagrams for most parts of a GUN4IR build.
The overall cost of a GUN4IR build will depend on how many DIY projects of this nature you’ve performed in the past, and what sort of soldering setup you already have on hand. There’s nothing in this build that’s too technically difficult, it’s mostly through-hole soldering and wire splicing, but the cramped nature of this project puts the difficulty closer to a moderately complex DIY project. There’s a decent amount of equipment you need to buy, so it might be worth getting your feet wet with a beginner Arduino project beforehand if this is your first time working with embedded electronics.
There’s a few 3D printed parts that makes this build significantly easier. If you don’t have access to a 3D printer, you can send these parts out to a print-on-demand service, or see if your local library has a printer you can borrow for an afternoon. (This is actually a thing, look it up.) If you don’t want to use 3D printed parts, you can also generally get by with smart use of hot glue and super glue.
This parts list is designed with US shoppers in mind. Mouser Electronics carriers the IR sensor and several cheap components, and Amazon has the rest of the parts in stock with free shipping. The Lightgunpedia links are more focused on the Chinese Aliexpress storefront, since their components are often a third of the price and can be shipped internationally. When working on a DIY project however, it can be frustrating to have to wait an additional 2-3 weeks to get a new part in the mail if you accidentally burn out an LED, so it’s nice to have some domestic alternatives.
Recommended Equipment
| Total Price | # | Part | URL |
|---|---|---|---|
| $15.99 | 1 | Basic Soldering Iron & Solder | Amazon |
| $10.99 | 1 | Basic “Third Hand” Workstation | Amazon |
| $16.85 | 1 | High Gauge Stranded Hookup Wire | Amazon |
| $13.83 | 1 | Wire Strippers | Amazon |
| $10.99 | 1 | Resistor Pack | Amazon |
| $11.99 | 1 | Small 2cm x 8cm Protoboards | Amazon |
If you’ve ever worked with embedded electronics before, there’s a good chance you have most of these parts laying around your house already. The soldering iron doesn’t need to be anything special, but we highly recommend having some sort of “Third Hand” tool to hold some of these small parts together while you’re soldering.

You’ll want some relatively high gauge stranded hookup wire for this project, and wire strippers to cut them into the appropriate length. A wire’s “gauge” is how thick the wire is, with higher numbers indicating a smaller diameter. “Stranded” wires are the opposite of “solid core”. They’re made up of several smaller strands of metal, and are more flexible. They can be slightly more tricky to solder, but they can bend around the inside of the gun’s case more easily.
Finally, you’ll need a variety of resistors and small protoboards. They’re used throughout the project, but I’ve included them just the one time in the price section here. If you really don’t like the idea of having stray resistors laying around the house, you can technically just pick up the ones you need.
IR Emitters
| Total Price | # | Part | URL |
|---|---|---|---|
| $6.73 | 12 | SFH 4547 LED | Mouser |
| $6.96 | 1 | USB Cable (Can reach USB power from TV/Monitor.) | Amazon |
| $6.99 | 1 | Generic 5v 2a USB Power Supply | Amazon |
| $13.49 | 1 | Heavy Duty Double-Sided Mounting Tape | Amazon |
| — | 4 | 5.6 Ohm Resistor | Included In Equipment Section |
| — | 1 | Small 2cm x 8cm Protoboard | Included In Equipment Section |
| — | 1 | High Gauge Stranded Hookup Wire | Included In Equipment Section |
| — | 4 | 3D Printed Emitter Enclosures | Thingiverse |
| $34.17 |
There are several different techniques when it comes to creating the four IR targets for the light gun. The two main schools of thought generally revolve around either providing a large amount of power to a single bright IR LED, or sending smaller amounts of power to a cluster of several dimmer LEDs. The community has mostly congregated around this latter approach. Using a fluster of three SFH 4547 LEDs on each of the four IR targets provides a good balance of brightness, beam angle, and it even comes in an easy-to-hide black color. Better yet, unlike the single high power option, the LED clusters don’t need a complex dedicated power supply. The entire setup can be powered by one standard 5V USB input. This can be either a dedicated power brick, or a USB port on the side of your TV or computer.
You can go to the trouble of building a USB-female socket onto your IR emitter setup, but we happened to have an unused USB printer cable laying around. It was just as easier to cut one end of the USB cable off and directly solder the red and black wires into the project.

Each cluster of LEDs needs a resistor. A quick trip to LEDCalc.com informs us that four 5.6 Ohm resistors should do the trick.

There’s a variety of housing options floating around the GUN4IR Discord and Thingiverse, but it can be a fun exercise to design something from scratch with TinkerCAD. The exact footprint of your circuit will probably differ unless you’re exactly mimicking someone else’s build. Our design’s over on Thingiverse as well if you’d like to take a look.

When wiring the LEDs together, there’s two approaches you can take. You can either have all four LED clusters wired up to a central point where the power’s supplied, or you can chain them together so that they’re a single strand. We went the single-strand daisy-chain approach here. The first IR emitter has the USB power soldered into it, and then has a positive and negative wire going to the next emitter. This emitter has the positive and negative input, and the sends out its own positive and negative output to the next emitter. This trend continues until the last emitter, which just has the single pair of inputs.

As you solder your emitters, you can check if they’re working by pointing your phone’s camera at them. Infrared “IR” light can’t be seen by the human eye, but thankfully smartphones have no trouble picking it up. Once the emitters are ready, fire up the GUN4IR utility on your PC and start the gun calibration mode. This screen will indicate exactly on your display where the emitters need to be positioned. Each cluster of LEDs should be placed in the center of each side of a monitor. Thankfully GUN4IR has support for a variety of aspect ratios, including ultrawide displays. Now that your emitters are in place, let’s take a look at the bare minimum needed to get a GUN4IR light gun itself built.
GUN4IR Basics
| Total Price | # | Part | URL |
|---|---|---|---|
| ~$30.00 | 1 | GunCon 1 | eBay |
| $23.55 | 1 | SEN0158 Sensor | Mouser |
| $20.69 | 1 | Arduino Pro Micro | Amazon |
| $3.06 | 1 | V19S05-EZ100 Switch | Mouser |
| — | 1 | 3D Printed MicroSwitch Mount | Thingiverse |
| $9.99 | 1 | Smartphone Fish Eye Lens | Amazon |
| — | 1 | 3D Printed Fish Eye Lens Holder | Thingiverse |
| $9.99 | 1 | 10ft USB Micro Cable | Amazon |
| $7.99 | 1 | 10ft Cable Sleeve (1/2″ Diameter) | Amazon |
| €15/$19 | 1 | GUN4IR License | ArcadeControls Forum / PayPal |
| $105.27 |

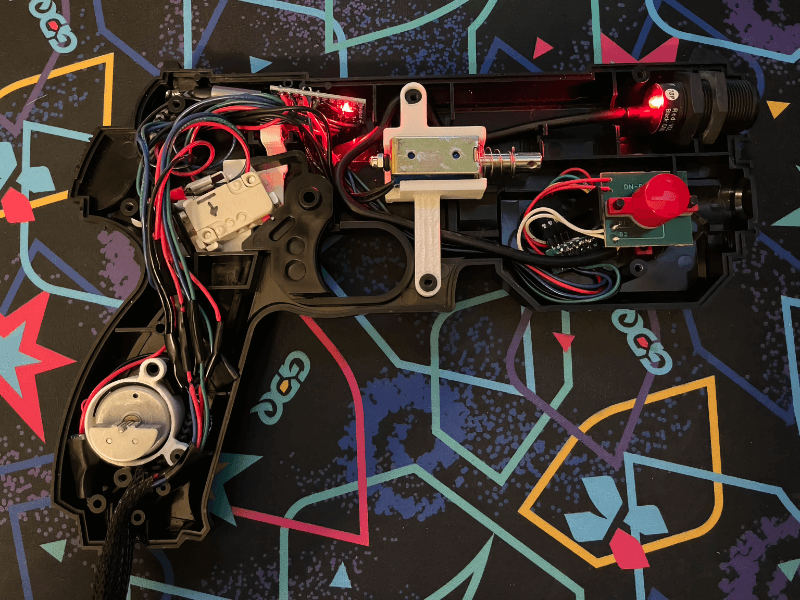
Alright, now the fun begins! There’s quite a few guns one could use as the basis for their GUN4IR build, but we decided to go with the PlayStation 1’s GunCon. Also known as the GunCon 1 or G-Con 45, this particular light gun is relatively straightforward. It has a trigger, a single A/B button on each side of the gun, and not much else going on. It’s successor the GunCon 2 included a few more buttons and a d-pad, but it’s also a bit more crowded on the inside because of it. For a beginner build, the GunCon 1 is a simple foundation that’s been leveraged by many GUN4IR community members. There’s a good amount of built up community knowledge and 3D printed parts to take advantage of in case you get stuck.

The heart of every GUN4IR build is a DF Robot SN0158 IR positioning camera. Conveniently for us, it comes in a handy gun-barrel shaped package that slots right into the GunCon housing without any need for a 3D printed part. If you can’t get ahold of the SN0158, there’s technically a method where you can salvage the IR camera from a broken Wii remote. This technique can work in a pinch, but it’s significantly more involved. Unless you’re working with a gun that’s too small for the SN0158, or it’s going through a severe part drought, it’s worth being patient and waiting for the Mouser restock.
(Edit: As of March 2022 when this article was finally published, it turns out the SN0158 is going through a significant parts drought! If you’re the resourceful type, it might be worth looking into Wiimote hacking at this point.)
All of the GUN4IR’s processing is performed on a standard Arduino Pro Micro. It’s hard to spend less than $15 online for an Arduino Pro Micro, so you might as well pick up the off-brand three pack from Amazon. You can use one of the Arduinos on a breadboard to test out your components, and have a spare in case when you accidentally short something out or pop off the USB socket.

Depending on which gun you use, you can sometimes re-use it’s original trigger button. For the GunCon, there’s a popular mod to replace its stock trigger switch with a nice springy microswitch. These are the same style of switches used in arcade game buttons, and should ensure that your gun is able to keep shooting for years to come. The V19S05-EZ100 is just the first one we found in the right formfactor with a good amount of resistance. If you use the usual 3D printed community mount, there’s a very small tab on the side of the switch you’ll want to snap off with a pair of Pilars.

The fisheye lens mod is usually listed under optional steps when building a GUN4IR light gun, but it’s useful enough that you probably just want to factor it into your initial build. The GUN4IR sensor needs to be able to see at least two of the four IR LED clusters in order to properly track your gun. With the standard camera configuration, this means you need to stand back a considerable ways from your screen. Using a fisheye lends gives the camera a wider field of view, allowing you to stand a bit closer to your monitor. It’s still not holding-a-Zapper-up-to-a-TV levels of closeness, but it’s still a godsend depending on your setup. Most of these fisheye smartphone camera lens kits also come with a macro lens, which can be a good compromise of distance and accuracy. The community has developed a 3D printed fisheye lens mount for the front of the GunCon, and there’s usually enough friction to keep it in place without the need for permanently gluing it on.
As far as cables go for the GUN4IR, ten feet is about the sweet spot for this project. The bare minimum cabling needed is the single micro USB cable needed for the Arduino Pro Mini. Unlike the IR emitters, you shouldn’t need to butcher the USB cable for this part of the project. Just plug it into the Arduino, find somewhere snug for it to sit in the GunCon, and close the two halves. (The space over the trigger can usually house the Arduino and USB cable without too much trouble.) The micro USB cable you purchase will be the new cord for your light gun, and plug straight into your PC.

Having a single thin USB cable can look a little strange dangling out of the bottom of a gun however. Additionally, the next few sections have some additional optional cables you can run to your light gun. Thankfully, there’s a variety of cable management solutions you can use to make your gun look like a real arcade installation. I personally like using a simple nylon sleeve. It’s plain, lightweight, and easy to work with. Once you’ve run a few cords through the sleeve, it starts to look more like the beefier cable you’re used to seeing snake out of light guns. The half-inch diameter option worked well for the three cables I ended up using in my build. If you want to go all out however, you can always use a metal shower hose to give your light gun a true arcade feel.
When budgeting out your light gun, it’s important to remember that while GUN4IR is a DIY project, it’s not an open source project. Make sure you factor in the $20 USD license cost for the GUN4IR’s GUI software. It’s a one time fee for as many guns and systems as you need, and JayBee’s put a lot of hard work into this project. He currently manually sends out the licensing files, so make sure you purchase one before you want to start testing out parts of your build.
If you want, you can stop here in the build guide. You’d get a basic, feedback-free GUN4IR light gun. Depending on how many of these parts you already own and where you source them from, you can end up with a device that’s roughly in the ballpark of an entry-level Sinden light gun. But there’s a lot more we can build into this gun, so let’s talk force feedback.
Rumble
| Total Price | # | Part | URL |
|---|---|---|---|
| $5.00 | 1 | Replacement Xbox 360 Rumble Motor | Amazon |
| — | 1 | 3D Printed Rumble Holder | Thingiverse |
| $0.43 | 1 | PN2222 Transistor | Mouser |
| $0.32 | 1 | 1N4001 Diode | Mouser |
| $0.25 | 1 | 0.1uf Capacitor | Mouser |
| — | 1 | 1K Ohm Resistor | Included In Equipment Section |
| $6.00 |
GUN4IR supports two types of force feedback. The more straightforward and quieter approach is to include a rumble motor in your gun. After buying a replacement Xbox 360 controller rumble motor, you just need to construct a small circuit so that it can be properly wired up to the Arduino. There’s once again a handy 3D printed part to hold the motor steady in the grip of the gun.

If you only include a rumble motor in your gun, it will give you a small vibration each time you shoot the gun. If you have both a rumble and a recoil solenoid in your gun, the rumble will activate when you perform a “reload” action. This can be simply pressing your gun’s A button, shooting outside of the screen area, or stepping on a GUN4IR foot pedal.
The nice thing about repurposing an Xbox 360 controller’s rumble motor is that it runs off of the Arduino’s 5v power. If you’re looking to make a simple and straightforward GUN4IR build, it’s generally worth including a rumble motor. It provides a nice amount of feedback without overly complicating the project. If you stop here, you can still just use the single USB cable for your gun.
Recoil
| Total Price | # | Part | URL |
|---|---|---|---|
| $8.89 | 1 | JF-0530B | Amazon |
| — | 1 | 3D Printed Solenoid Holder | Thingiverse |
| $1.48 | 1 | IRL540 MOSFET | Mouser |
| $0.32 | 1 | 1N4001 Diode | Mouser |
| $2.06 | 1 | TMP36 Temperature Sensor | Mouser |
| $0.25 | 1 | 0.1uf Capacitor | Mouser |
| — | 1 | 100K Ohm Resistor | Included In Equipment Section |
| — | 1 | 1K Ohm Resistor | Included In Equipment Section |
| $17.29 | 1 | 12V Adjustable PSU | Amazon |
| $9.85 | 1 | 5.5mm x 2.1mm 10ft Power Extension Cable | Amazon |
| $40.14 |
This is where things get complicated. One of the most enticing aspects of arcade light guns is that, starting in the 90s, they began to offer varying levels of recoil to the player. Namco’s Time Crisis series in particular was famous for incorporating a full plastic slide-action on the top of their arcade cabinet’s light gun. These recoil systems usually take advantage of a mechanism known as a solenoid, and thankfully GUN4IR can leverage them too.

Solenoids are a type of electromagnet. When you pass a current through them, a metal slug is pulled through the coil, triggering some mechanical action. Solenoids aren’t particularly common in consumer electronics, but you’ve probably come across a few in your day to day life. The “clunk” of your washing machine door locking into place is triggered by a solenoid for example. They’re good at rapidly applying a strong amount of force across a small space.
In other words, turning a solenoid on and off is a perfect way to simulate recoil. There’s two approaches one can take when using a solenoid. You can either embed a solenoid inside of a light gun, or you can attach the solenoid to a slide-action mechanism. There’s a good number of slide-action GUN4IR builds online if you’re curious what people have come up with. Some of them take advantage of light guns which already hade a slide-action solenoid built in, while others employ creative 3D printing and other hacking to mod it onto existing static guns.

For the purposes of this build however, we decided to incorporate a solenoid on the inside of the light gun instead of building out a full slide-action. Seeing those sorts of moving parts on the outside of your light gun are super cool, but they also add a significant amount of complexity and cost. Mounting the solenoid on the inside of the light gun still provides the kick that you’re looking for, and if nothing else it gives you experience working with them for your next light gun build.
…you’re probably not just going to build one of these, right?
We chose to go with a JF-0530B solenoid for this build. It’s on the smaller side of things, but it still gives you a nice kick each time you fire your gun. You can definitely feel the gun rock back and forth, but it doesn’t distract from your aiming or wear out your hands. There’s a larger JF-1039B solenoid which reportedly can fit inside of a GunCon 1 shell, but we had difficulty getting the two pieces of the gun shell to come together fully with the beefier solenoid inside of it. It’s worth noting that the JF-0530 and JF-0530B are slightly different parts. Make sure you go with the B model.
It’s listed as optional in the GUN4IR build guide, but it’s a good idea to include a temperature sensor in your gun to keep an eye on the solenoid. They can build up heat over time, and thankfully there’s code built into the firmware which can automatically turn off the kickback if things get too warm.

Like with the rumble motor, you’ll need to build a small circuit in order to safely wire it up to the Arduino. Unlike the rumble motor, the solenoid can’t operate off of the Arduino’s 5v of USB power.
The big jump in complexity when adding a solenoid comes from the fact that they need at least 12v of power to provide an adequate kickback. Some solenoids can operate with up to 24v of power, but there’s some diminishing returns once you start getting up that high.

You’ll need a dedicated power cord to get the extra voltage to your gun. Normally this would mean your gun would have two cords dangling from it, but that’s why we included the nylon sleeve in the earlier parts list. The power cord and USB will sit snugly together in the sleeve, letting you plug the power supply in down at the base of the cable near where you plug the USB cord in. I ran into trouble using a 3-12v variable power supply that I already owned, so the one I included on the parts list is a larger 3-24v variable power supply. Even though I was only using a 12v solenoid, this larger power supply works like a charm.
When wiring the gun, you’ll cut off the end of the power extension cord and wire the red and black power lines directly into your recoil’s circuit. Make sure not to short out any connections, and wrap everything in electrical tape. Our first attempt at getting this circuit working unfortunately fried an Arduino, but thankfully there’s not too many safety concerns moving from 5v to 12v. You might burn yourself, but you’re not going to do much more than that.

That was a weird note to end on. For an extra $6, adding rumble support to a light gun is a no brainer. Recoil costs quite a bit more at $40, but the Sinden light gun has a larger jump with its recoil option adding on an additional £50/$67. If you’re going to all the trouble to build a light gun, you may as well go all out. If you’re worried about the additional build complexity though, sticking with just the rumble is fine.
As a brief aside, you may notice that the kickback Sinden light gun runs completely off of 5v USB power. Instead of using a dedicated power supply, the Sinden has a capacitor in the gun that stores a charge over time. When you pull the trigger, the capacitor dischargers and the gun’s solenoid triggers. It takes a while to charge the capacitor however, so several rapid fire shots in a row will have smaller and smaller kickbacks until you stop shooting and give the gun a chance to charge. The GUN4IR system has its own complexities with a dedicated PSU, but it does manage to avoid this particular issue.
On the software side of things, the GUN4IR is smart enough to know when you’re shooting at the screen. The gun will recoil when you’re shooting at an enemy, but it will hold off on triggering a recoil when you shoot outside of the screen to reload. The recoil itself does produce a decent amount of noise, so there is an option of disabling the solenoid recoil if your housemates are trying to focus on something a few rooms over.
Foot Pedal
| Total Price | # | Part | URL |
|---|---|---|---|
| — | 1 | 3D printed or DIY foot pedal | Thingiverse |
| $3.06 | 1 | V19S05-EZ100 Switch (If 3D Printing) | Mouser |
| $11.99 | 1 | M2.5 Screws & Nuts (If 3D Printing) | Amazon |
| $19.90 | 2 | 10ft Headphone Extension Cable | Amazon |
| $34.95 |
Finally, we arrive at the most optional part of this particular build. As light gun games have gotten more complex, they’ve often started to include alternate fire modes outside of the standard trigger action. For many games, simply including an extra button or two on the side like the GunCon’s A and B buttons is a fine solution. For other games however, it can be much more fun and immersive to include a foot pedal peripheral. Time Crisis just isn’t the same when using a button on the side of the gun to duck behind cover.

The most straightforward approach is to just buy a separate pedal accessory. Amazon has a variety of $15 USB foot pedals, and for most emulators, you shouldn’t have a problem mapping the GUN4IR’s inputs and the USB foot pedal to different actions in your game.
In the case of software which can only recognize one input at a time however, it can be nice to have the pedal directly wired into the GUN4IR system so that it can handle everything. Additionally, if you plug a pedal directly into your GUN4IR, its firmware will know when you step on the pedal, and can trigger effects such as a gentle gun vibration when you successfully put your foot down.
If you’d like to include a pedal in your GUN4IR build, you can either 3D print one, or just purchase an existing non-USB foot pedal switch. We decided to go with the 3D printed approach for our first pass, leveraging an existing design from Adafruit. No matter which approach you decide to take, you’ll have a foot pedal which acts like a push button. You connect one wire to the button pin on the Arduino, the other wire to the ground pin on the Arduino, and when you step on the pedal, the button is pushed and the signal is sent.

Easy peasy. If you decide to go the 3D printed route, just follow the Adafruit guide up to the point that they wire it into their microcontroller. If you use the prebuilt option, just strip the wires back enough where you can solder them.
The real question here is a matter of wiring. You can use up 10ft of your hookup cable if you’d like, but that’s a relatively permanent solution. It’d be nicer if we could leverage some sort of quick connector so that the pedal doesn’t always need to be plugged in. The connector type doesn’t particularly matter here. You need a signal wire, a ground wire, and that’s about it. Anything that could carry two signals would work here, but a headphone jack is a popular choice in the community.
To get things started, buy two 10ft headphone extension cables, and trim the male connector off of one of the extension cables. The remaining 10f of cable and the female connector are going to be the length you incorporate into the light gun’s cord. Once again, we’ll be leveraging the nylon sleeve to keep everything looking nice. Solder one of the headphone cable’s signal lines into the foot pedal pin on the Arduino, and then connect the ground pin to the headphone jack’s ground wire.
On the foot pedal side of things, solder the trimmed male headphone cable onto the end of our foot pedal’s pushbuttons. Now we’ve got a light gun cable with a headphone socket at the end, and a foot pedal with a headphone plug at the end. Perfect, except now our foot pedal is way across the room over by where we plugged the light gun into the PC. That’s why we bought a second 10ft headphone extension cable. Plug the foot pedal into the extension cable, then plug the extension cable into your gun, and place it wherever you’d like to play.

It turns out modern headphone cables aren’t as easy to splice and solder onto as the inside of a USB cable. Your typical pair of earbuds use a much finer wire than your standard cable, and they’re spray-coated with nylon instead of easily strippable insulation. If you ever find yourself in the situation of trying to solder onto this type of cable, your best bet is to bust out a lighter and burn off the insulation itself. You’ll eventually get enough exposed metal to solder onto, but this is clearly not the ideal cabling choice. If you have a bit more time to spend browsing around Mouser’s cable and connector department, we’d recommend attempting to come up with something a bit more sturdy.
Additional Options

GUN4IR is incredibly flexible when it comes to adding additional hardware components. For the more flashy individuals out there, GUN4IR allows you to add an RGB LED in addition to the other types of feedback discussed above. The firmware allows you to have the lights flash different colors based on different actions such as shooting and reloading. It can be a nice option depending on the type of gun you’re building, but we were seeking to maintain the GunCon’s classic look and feel for this build.
The GUN4IR also supports more than just the GunCon’s A and B buttons. As we touched on briefly earlier, it fully supports button-laden guns such as the d-pad equipped GunCon 2. For the DIY crowd, there’s nothing stopping you from drilling into your gun and adding a new button or two. The community of GUN4IR owners modding NERF guns has gotten particularly clever when it comes to new button placement.

Finally, you can add a Wii Nunchuck controller port to your GUN4IR. This gives your light gun two additional buttons, as well as an analog stick. The stick itself is mapped to 4 digital directions in the GUN4IR firmware at the moment, but full analog support may come in the future. While holding into another controller during a light gun game can be a bit unwieldy, this is a nice option for building a minimal gun that can still scale to more complex games.
GUN4IR Software

As a DIY passion project, it’s no surprise that the GUN4IR system has a plethora of software options to go along with the customizable hardware. The majority of the software runs on the light gun itself. The Arduino mimics a standard HID mouse and gamepad, allowing it to run seamlessly with most emulators and games on the market. There’s a PC GUI for GUN4IR’s configuration options, but they just send various configuration commands to the gun. Unlike the Sinden light gun, you don’t need the GUN4IR software running on your PC. Quite the contrary, you technically don’t even need it installed.
When you first get your GUN4IR system built, you’ll want to run through the GUI’s calibration screen to get the gun tracking properly. This only needs to be performed once for a given setup, so unless you move your gun to a different machine or display, it should just be pick up and play for future gaming sessions.
The GUI allows you to remap the light gun’s buttons to various keyboard/mouse commands. You can easily get your GUN4IR behaving like an actual GunCon for Playstation 1 games, or map an arcade machine’s insert coin and start buttons right onto your gun’s extra buttons. There are a few hardcoded assumptions in the software currently, such as assuming that the first button on your gun is always going to be used for reloading, but JayBee is working on a new version of the firmware which will allow users to customize some of those options.

There’s also a variety of options for the force feedback components we discussed earlier. You can tweak the solenoid timings, or temporarily disable the kickback recoil completely if you need a quieter gaming session. GUN4IR also supports a “full auto” recoil mode for games that have you press-and-hold the trigger button. Rather than having the gun kick back once, it will provide a steady rhythm of solenoid thumps. You can also adjust how intense the rumble motor vibrates if you installed one in your gun.
Outside of that, there’s not much more that the firmware and GUI need to perform. There’s a few sensitivity tweaks you can make to how the gun tracks, but we found that the default option works pretty well out of the box. Once you’ve gotten your gun properly configured and set up, the feature you’ll be adjusting most often is the 4:3 and fullscreen modes. Certain emulators map gun movements to a fixed 4:3 aspect ratio, and the GUN4IR will need to know to send these adjusted movements. Otherwise, fullscreen mode works well for most software.
JayBee’s also done an excellent job of providing automation hooks into the GUN4IR. Depending on your frontend or emulator, you can have tools such as Launchbox and MAMEHooker automatically reconfigure your light gun when you launch specific titles.
Emulator Experience

GUN4IR shows up on your computer as a mouse. When you plug in your light gun and point it at your PC’s screen, the cursor will begin tracking across your desktop. Pulling the trigger will cause a left click, and reloading will cause a right click. Most emulators support some sort of mouse-to-light gun shooting that the GUN4IR can leverage. This isn’t unique to the GUN4IR either. The Sinden light gun, the AimTrak, and other light gun projects behave the same way.
Unfortunately, very few emulators have a completely straightforward mouse-to-gun experience. Console emulators for platforms like the NES and the SNES are the most straightforward, but wrinkles start to emerge from there.
A good number of light gun titles were ported to the PlayStation 1. The DuckStation emulator does a fine job of mapping mouse clicks to these games… as long as they support the GunCon. Konami’s competing “Justifier” light gun does not have DuckStation support, so you’ll have to either patch your Justifier games to add GunCon support, or use a different emulator for those titles.

On the PCSX and PCSX2 side of things, you’ll need to use the “Nuvee” input plugin to handle light gun games. It’s not too difficult to use once you get it working, but the initial install and configuration was surprisingly obtuse. In addition to installing the plugin, there’s a decent amount of manual config file creation that needs to be performed before you can start playing. RPCS3 doesn’t fare much better for PlayStation 3 games. If you’d like to get an instance of Time Crisis 4 running, you’ll need to leverage AutoHotkey scripts just to get past the gun calibration step.
Most installs of MAME will be set up with a joystick-to-cursor setup out of the box for light guns, which means delving into some .ini files before you can start playing. None of this is particularly onerous, but it does mean that setting up certain games can feel like an afternoon project.
This isn’t the fault of GUN4IR. Their community Discord has a channel dedicated to assisting with game configurations, and the Sinden light gun wiki has configuration instructions that also work with GUN4IR for nearly all light gun compatible games you can play on a PC. It’s just worth noting that each platform has its own quirks to it, and things may not be as straightforward as a brief experience pointing-and-clicking around Battle Clash in ZNES would lead you to believe.
GUN4IR’s mouse masquerading technique means that it could hypothetically work on any system that accepts mouse input. However, the GUI software is designed exclusively for Windows at the moment. Light gun game support is limited on Macs, so that isn’t a huge loss there, but there is the occasional interest in Raspberry Pi light gun gaming online. There are technical ways of getting the GUN4IR working with a Pi involving writing serial commands to the gun in order to change configuration settings, but it can be a bit more trouble than its worth unless you’re creating a custom MAME cabinet installation.
GUN4IR Experience
So, you’ve gone to all the trouble of building a GUN4IR light gun, plugging in it’s USB cord, powering up the external PSU, attaching the pedal, and booting up your game-specific emulator configuration. How’s this all actually feel to play?
It’s damn near perfect. If you grew up in an arcade, your muscle memory will come back nearly instantly. If you’ve played a few Wii light gun shooters, it’s hard to overstate how fun it is to go back to some of the older titles that didn’t need to constantly draw a cursor on the screen. Everyone’s probably has their own specific title that drew them to the idea of getting a light gun for the home, but the big draw for this specific build was in revisiting the arcade game Point Blank.
It’s a shooting gallery mini-game collection made by Namco. Several of its challenges relied on having pinpoint accuracy, and it’s been a titled that’s been remarkably hard to revisit to with some of the earlier half-measure light guns. The first “quick test” of GUN4IR with this game quickly devolved into an hour plus of pure light gun gaming bliss.
There’s one mini-game which presents a straightforward challenge. You have one chance to shoot a tiny apple off of a character’s head. This challenge was always a good test of how well your local bowling alley’s light gun was calibrated, and sure enough, the GUN4IR shot the apple on the first try.
Overall, we were incredibly pleased with the GUN4IR system. It’s been a delight revisiting these classic games without needing to schlep across town to the arcade, if that’s even an option in your area anymore. The GunCon 1 also proved to be an excellent basis for this built. The parts have a nice distribution of weight, and the small amount of heft that the light gun has makes it feel like it has a more solid construction than its humble PlayStation accessory origins.
Conclusion

If you’re on the fence about building a GUN4IR gun, hopefully this overview has given you a good idea as to what you’re signing yourself up for. If you’re curious about the light gun but aren’t quite ready to bust out the soldering iron, JayBee’s currently in the process of putting together some prebuilt units to sell online. Light guns remain a niche area of video gaming, but if you’ve been waiting for the tech to finally allow them to come home, your time has finally arrived.
Mission Start… Action!